The motorcycle hub motor is the standard drive layout on the electric two- and three-wheelers doing commercial work today — and when one of these machines loses power, makes noise or cuts out, the motor gets blamed first. Often the fault is somewhere else: in a corroded connector, a stuck brake-lever switch, a sagging battery or a chafed harness.
This guide is written for dealer technicians and fleet maintenance staff: how to read the symptoms, what to check in what order, which fixes are safe to do in a workshop, and where the line is between maintenance and a job for a specialist.
Is It Really the Motor? Diagnosis Before Disassembly
A brushless motorcycle hub motor is a simple machine — windings, magnets, two bearings, sensors. There are no brushes to wear out and very few moving parts. The components that fail first on a working vehicle are usually the ones exposed to the environment and the ones moving on every trip: connectors, cable runs, brake components, battery management.
Every hour spent opening a wheel hub before ruling out the external causes is an hour wasted — and opening a hub disturbs its original sealing, which then has to be restored deliberately, using the specified seals and the manufacturer’s reassembly procedure.
Three principles govern everything below:
- Outside in. Check connectors, switches and cables before components.
- Mechanical before electrical. A dragging brake is cheaper than a rewound motor — and it mimics several electrical faults.
- Reproduce before replacing. A fault you can reproduce is a fault you can verify fixed.
Safety note: electric motorcycles in the 48–72V class carry enough current to cause serious injury, and a wheel that comes off wrong is a hazard in itself. Lower voltage does not mean lower risk — short-circuit current, arc flash, burns and a dropped vehicle are the practical hazards here, not only electric shock. Power down before disconnecting anything, keep hands and tools clear of the wheel when the vehicle is live, and read the hands-on boundary in the section below before starting work.
How a Motorcycle Hub Motor Fails: Anatomy in Five Minutes
Knowing the parts turns symptoms into diagnoses:
| Part | What it does | How it fails |
|---|---|---|
| Stator windings | Electromagnets that drive the rotor | Overheat and short or open; insulation degrades with heat and moisture |
| Rotor magnets | Permanent magnets on the rotating shell | Demagnetise after sustained overheating — permanent power loss, no repair |
| Hall sensors | Tell the controller the rotor position | Fail from heat and vibration — judder or hesitation at start-up, or a motor that needs a push before it turns |
| Bearings | Let the wheel turn freely under load | Wear from load, water ingress and impacts — grinding noise rising with speed |
| Seals | Keep water and dust out | Degrade with age and heat; every opening of the hub damages them |
| Phase wires & connector | Carry power between controller and motor | Oxidise, chafe, loosen — resistance, heat, intermittent cut-outs |
Symptom Quick Reference
Start here. The left-hand column is what the rider will actually say at the counter — which is rarely the technical description in a service manual.
| What the rider says | Most likely cause, in order | First check | Stop riding? |
|---|---|---|---|
| “It won’t move at all, but the lights work” | Brake cut-off switch → power path → phase / Hall | Release both brake levers and retest; then fuses and main connectors | No |
| “I can barely push it backwards” | Brake drag → seized bearing → controller phase short | Isolate the three phase wires (power off): turns freely = controller is the lead suspect; unchanged = mechanical drag | Yes |
| “It sounds like there are rocks in the wheel” | Worn bearings → brake drag → rim or tyre damage | Free-spin with power off; rock the wheel laterally for play | If severe |
| “It stutters pulling away but runs fine once moving” | Hall sensor → loose Hall connector → phase connector | Hall signal toggle test while turning the wheel slowly | Yes, until diagnosed |
| “It cuts out on hills and comes back after a rest” | Connector heat → battery sag → thermal protection | Feel connectors for heat after a duty run (power off first) | Yes, until diagnosed |
| “It smells burnt and the hub is hot” | Winding insulation → connector/terminal → controller | Stop immediately; inspect terminals and casing for discolouration | Immediately |
Common Failure Modes
Noise and Vibration
Symptom: grinding, humming or knocking from the wheel, usually increasing with speed, sometimes only under load.
Likely causes, in order:
- Worn bearings — a frequent mechanical failure on high-mileage commercial vehicles. Grinding that rises smoothly with speed points here.
- Brake drag — a caliper that does not fully release rubs the disc; often misdiagnosed as motor noise.
- Axle nut torque issues — loose or over-tightened axle nuts distort bearings and create play and noise.
- Tyre or rim damage — uneven wear, dents and spoke issues transmit straight into the frame.
- Internal rub — stator touching rotor after bearing failure progresses; the last stage before seizure.
Field checks: lift the wheel and spin it by hand with the power off — bearing grind is audible on a free-spinning wheel. Rock the wheel laterally to feel play (wheel bearings, not steering). Sight along the disc to check caliper clearance. Verify tyre pressure and condition. Re-check axle nut torque against the vehicle’s documented specification — do not guess the value.
Stop line: bearing replacement means opening the hub with press tools and re-sealing it. That is a technician’s job, not a roadside one.
No Power / Motor Not Spinning
Symptom: throttle produces nothing at all — or the motor hums, stutters or turns only when pushed.
Likely causes, in order:
- Brake-lever cutoff switch stuck engaged — check this first. A bent or corroded switch tells the controller the brake is on, produces exactly this symptom, and takes two minutes to rule out.
- Power path — blown fuse, main connector unseated, ignition fault, battery contact failure.
- Phase wire or connector fault — oxidised, loose or broken phase connections; the classic “hums but won’t spin” case when only one or two of three phases connect.
- Hall sensor failure — position feedback lost, so the controller cannot time commutation; the motor judders at start-up or refuses to turn cleanly.
- Controller failure — diagnosed last, after the four items above are ruled out.
Field checks: release both brake levers and retry. Open and re-seat every connector in the power path, looking for green or white oxidation and heat discolouration. Test the brake switches with a continuity check across the switch. Record any error code on the display before clearing it. A hum with no rotation points to phase or Hall faults; complete silence points to the power path or controller.
On throttle signals: most Hall-effect throttles should sit around 0.8–1.0 V at rest and rise smoothly to roughly 4.2 V at full opening with the ignition on. A signal that stays flat, jumps, or sits at 0 V or 5 V points to the throttle or its wiring rather than the motor. Confirm the expected range against the vehicle’s own documentation before condemning a throttle.
If the wheel is hard to push: separate the four causes before doing anything else. Brake drag is the cheapest and quickest to rule out — sight along the disc for a rubbing caliper. Bearing seizure gives resistance that changes as the wheel turns, usually with noise. A shorted controller can also lock the wheel electrically: with the power off, isolate the three phase wires from the controller and turn the wheel again. If it turns noticeably more freely, the controller is your lead suspect — test it across its phase outputs, or substitute a known-good unit. If the resistance is unchanged with the phases isolated, the drag is mechanical: check the caliper, then the bearings. Debris or a detached magnet scraping the stator gives metallic noise plus resistance that does not change when the phases are isolated.
Stop line: controller replacement involves parameter matching to the motor — a technician task. Opening the hub to reach Hall sensors is a technician task.
Power Loss Under Load
Symptom: the vehicle runs fine unloaded but weakens on hills or with cargo; the hub or controller runs hot after a shift; range has quietly fallen.
Likely causes, in order:
- Connector resistance — a partly oxidised joint heats up under load and drops voltage. Warm connectors after a duty run are the tell.
- Battery voltage sag — aging or undersized packs plunge under load; the BMS or controller then limits current. Battery behaviour under load is covered in our electric moped battery guide.
- Controller thermal protection — a designed limitation rather than a fault; it points to a duty cycle or cooling problem.
- Bearing drag — mechanical load stealing power and generating heat.
- Magnet demagnetisation — permanent, caused by sustained over-temperature in the past; the motor never gets its old torque back.
Field checks: after a normal shift, feel-test connectors for heat (power off first). Compare unloaded versus loaded performance on the same route. Load-test the battery. If power is down with a cool battery and clean connectors, the motor or controller is the remaining suspect. For how controller rating and current limits interact with motor behaviour, see our guide to ebike controllers.
Intermittent Cut-Outs and Error Codes
Symptom: power disappears and returns after a restart; happens more in rain, on rough roads or under vibration; the display shows codes.
Likely causes, in order:
- Water ingress — after rain, deep puddles or pressure washing; corrodes connectors and sensor boards from the inside.
- Chafed harness — a cable run rubbing the frame shorts only on bumps. The classic intermittent.
- Loose connectors — vibration-dependent contact failure.
- BMS cutoff — the pack protecting itself; the “fault” is really the battery’s state of health.
- Controller protection — over-current, under-voltage or thermal limits kicking in.
Field checks: record the code and the exact conditions before clearing anything. Inspect harness routing at every chafe point (steering head, swingarm pivot, wheel entry). Open connectors and look for moisture and green oxidation. Ask the rider about water exposure — including how the vehicle is washed.
Stop line: intermittent faults that survive the connector and harness checks need diagnostic tools and patience. Hand them to a technician with the error history documented.
Overheating, Burnt Smell and Discolouration
Symptom: the hub casing is hot to the touch after a normal shift rather than merely warm; paint or lacquer on the casing is discoloured; there is an acrid, burnt-varnish or burnt-plastic smell; terminals look blackened. The rider will often say “it smells like burning” before reporting any loss of power.
Likely causes, in order:
- Terminal or connector resistance — a partly oxidised joint runs hot under current, darkens, and eventually melts its housing. Smell originates at the connector, not inside the motor.
- Sustained overload — hill duty, heavy cargo or a rider plus passenger on a machine rated for one. Cumulative heat degrades insulation before anything visibly fails.
- Controller MOSFET failure — the burnt smell frequently starts at the controller, and the motor is blamed because it is the part that stopped turning.
- Winding insulation breakdown — the end stage. Once varnish has carbonised, the winding shorts and the motor is scrap rather than repairable.
- Magnet demagnetisation — a consequence rather than a cause: sustained over-temperature permanently reduces magnetic strength, and the motor never regains its original torque.
Field checks: stop using the vehicle, switch off, and isolate the battery following the manufacturer’s procedure. Do not re-energise to “see whether it comes back”, and do not put a hand on a hub or connector that may be hot — let it cool, or use a non-contact thermometer. From a safe distance, look for discoloured terminals, hardened or cracked insulation and blistering on the casing, and note where the smell is coming from before opening anything. Any further electrical testing belongs to a technician.
Stop line — this one is absolute: a vehicle that smells burnt should not be ridden or re-energised. Insulation breakdown can cascade: a shorted winding can take out the controller, and a shorted controller can destroy a replacement motor. Diagnose before powering up again, and if the smell came from inside the hub, treat the motor as suspect until insulation testing says otherwise.
What You Can Fix Yourself — and What You Shouldn’t
Safe in a dealer workshop (low-voltage, mechanical)
- Connector cleaning and protection — disconnect, dry, clean contacts, apply dielectric grease, re-seat firmly. The single highest-value intervention in tropical markets.
- Brake drag correction — caliper realignment, pad inspection, lever adjustment.
- Axle nut torque re-check — to the manufacturer’s documented figure, with a torque wrench. Loose axle nuts destroy bearings; over-tightened ones do too.
- Tyre pressure and condition — the cheapest efficiency and range fix there is.
- Brake-lever cutoff switch check — clean or replace the switch; two minutes that resolve many “dead” vehicles.
- Seal visual inspection — look for cracks and gaps where the axle enters the hub.
- Error code documentation and reset — record before clearing, per the service manual.
Technician-only (stop here)
- Bearing replacement — requires press tools and re-sealing; improvised hammer-and-punch methods damage precision surfaces.
- Stator, Hall sensor or magnet work — the hub must be opened, and sealing is compromised afterwards.
- Controller replacement and matching — parameters must match the motor; wrong pairing accelerates the next failure.
- Higher-voltage traction platforms — vehicles above this class (roughly 100 V and up) sit in a different hazard category and need a different isolation and discharge procedure. This guide does not cover them.
One boundary worth stating: this guide does not cover performance modifications, speed-limit removal or controller parameter tuning. Such changes may violate local regulations, void certifications and warranty, and are not supported.
Preliminary Electrical Checks for Qualified Technicians
When the fault survives the field checks above, a systematic electrical diagnosis answers the remaining questions. Work dead: power off, remove the battery or isolate the service disconnect, and allow DC bus capacitors to discharge before touching terminals.
| Measurement | Healthy reading | What an abnormal reading means |
|---|---|---|
| Resistance between each pair of the three phase wires | Three readings roughly equal (low ohms) | Unequal readings point to a damaged winding or a bad phase joint. Equal readings, however, do not exclude every winding fault. |
| Hall sensor supply voltage | ≈5 V at the sensor connector (confirm the spec) | No supply points upstream — harness or controller — rather than at the sensor itself |
| Hall signal while turning the wheel by hand | Each channel switching between low and high as the rotor passes | A channel stuck high or low points to that sensor, its supply or its wiring — check all three before replacing the sensor |
| Insulation from phase wires to casing/axle | Effectively open circuit | Low resistance = insulation breakdown — do not re-energise |
| Voltage at the motor connector under load | Tracks battery voltage closely | Large drop = connector or harness resistance upstream |
The phase-to-phase comparison test needs nothing more than a pair of hands. With the vehicle powered down and all three phase wires isolated from the controller, spin the wheel: it should turn freely. Now hold two phase terminals together and spin again — you should feel a distinct magnetic drag. Repeat for each of the three pairings.
Reading the result. If all three pairings give the same drag, no phase is open — move on to the controller and the sensors. If one pairing gives no drag while the other two do, that phase is open: a broken winding, a broken lead, or a bad joint in the cable to the axle. That is a definite finding, and the motor comes off the vehicle. The difference between the free spin and the paired spin is obvious by hand on both geared and direct-drive hubs — if you cannot feel it at all, the wheel was not turning fast enough.
Taken together, these checks usually narrow the fault to one system — motor, controller or supply. Read the table as a set: the reading that departs furthest from the others is your lead. Then confirm with a swap test where spare units are available — a known-good controller on the suspect vehicle, or the suspect motor on a known-good vehicle. Replacing a part on a hunch is guesswork at the customer’s expense.
Repair, Replace — and the Sensorless Shortcut
Once the fault is isolated, the repair decision should consider more than the immediate parts bill. Six factors usually decide it:
| Factor | Repair is reasonable when… | Replacement is the better call when… |
|---|---|---|
| Fault extent | Isolated to a serviceable part — a connector, a bearing, a cable | Multiple internal parts affected, or insulation has carbonised |
| Parts availability | Correct parts and service data are on hand | Parts are unavailable or months out |
| Labour | A qualified technician can do it reliably within a normal job time | Labour approaches the cost of a unit |
| Sealing afterwards | The workshop can restore the factory seal properly | It cannot — an opened hub that is not re-sealed to spec will fail again in the rain |
| Warranty | The repair keeps the unit’s coverage intact | The policy requires assembly replacement, or repair voids it |
| Duty | Light commuter use where a second failure is an inconvenience | Commercial duty where a second failure is lost revenue |
The third-party sensorless controller workaround
Dealers will encounter this: a motor whose Hall sensors have failed, and an owner — or a workshop — who fits an inexpensive third-party sensorless controller instead of repairing the sensor or replacing the motor. The wheel turns, the vehicle moves, and the problem is declared solved.
What goes wrong is usually the matching, not the principle: a controller chosen on voltage and wattage alone, with no verification of phase current limits, commutation strategy or start-up behaviour. What that substitution changes:
- Low-speed launch. Sensorless control estimates rotor position from back-EMF, which is weakest exactly when a loaded vehicle needs precision most — pulling away from rest. Expect hesitation or reduced torque at start-up, with severity depending on the controller’s algorithm.
- Behaviour under load. On a gradient or with full cargo, a mismatched controller is more likely to lose sync. Not every unit will, but the risk rises with load — the condition a delivery vehicle spends its day in.
- Energy consumption and heat. Less accurate commutation timing can turn more of the pack’s energy into heat rather than motion, but how much depends on the unit and the matching. It is a claim that should be measured, not assumed.
The practical consequence for a commercial buyer is not that the vehicle fails outright, but that its performance envelope has quietly changed. A machine that used to pull away with a passenger on a hill may now struggle with the same load, and range may no longer match what the fleet plan was built on. “The wheel turns” is not an acceptance criterion for commercial operation.
A practical rule: prefer a repair path the manufacturer recognises. A Hall-sensor fault does not automatically mean the whole motor must be replaced — where the design allows access and the workshop can restore the sealing to specification, sensor replacement is a legitimate repair. Where it cannot, replace the motor rather than fitting an unmatched controller and calling it fixed.
Maintenance That Prevents These Failures
Most hub-motor failures on commercial duty are slow-developing and visible in advance. In hot, wet markets the checklist is short and pays back quickly:
- Connector care: inspect and re-grease major connectors at each service; oxidation is a frequent cause of intermittent faults in coastal and high-humidity regions.
- Wash and water discipline: never pressure-wash directly at the hub, axle entry or connector boots; after riding through water, dry and inspect before storage.
- Torque rounds: axle nuts and brake fasteners checked at scheduled intervals against documented values.
- Brake drag check: free-spin the wheel at every service — a rubbing caliper wastes range and destroys pads.
- Heat history: hubs that have run hot (hill duty, overloaded) should be flagged for bearing and magnet inspection before they fail on the road.
The same build details that prevent motor failures are also the ones that decide how far a vehicle actually goes. For the range side of that equation, see what actually determines real-world range.
Spare Parts Strategy for Dealers and Fleets
A motorcycle 300 km from the nearest workshop waiting on a single controller is not a vehicle — it is a stranded asset, and its rider stops paying instalments long before it is fixed. Diagnosis only pays if the fix is on the shelf. A practical holding pattern for hub-motor fleets:
- Controllers — matched to the motor variants you actually operate; the longest lead-time item.
- Connector and harness sections — the parts you will use most, and the cheapest.
- Brake pads, axle nuts and washers, axle seals — high-turn consumables.
- Bearings — if you have a technician who can press them.
- At least one complete hub motor per vehicle model family — for swap-first repair: exchange the unit, diagnose the old one at the depot. Vehicle uptime is the metric, not repair cleverness.
Before you order a replacement motor
A motorcycle hub motor is not interchangeable by voltage and wattage alone. Confirm all of the following against the original unit, or you will be fitting a motor that does not fit, does not match, or cannot be documented for the customer:
- Wheel size and rim type — including whether the motor is supplied laced into a wheel or bare.
- Axle diameter and dropout width — the two dimensions that most often disqualify a “compatible” unit.
- Mounting arrangement and anti-rotation — torque arm or tab, and which side it sits on.
- Phase wire gauge and connector — connector body type, pin count and pin assignment, not just colour.
- Sensor type and connector — sensored or sensorless, 5-pin or 6-pin, and pin order.
- Controller compatibility — rated voltage, phase current limit, and whether the controller expects Hall feedback.
- Brake interface — disc mounting pattern and rotor size where the motor carries the brake.
- Nameplate and documentation — rating plate, wiring diagram and any certification your market requires.
Keep a failure log
For each reported fault, record the vehicle model and motor identification, date and mileage or operating hours, the rider’s description and the conditions it occurred in, any error codes, what was replaced, and whether the fault returned. Over a few months that log distinguishes isolated damage from a batch or a duty-cycle problem — and it is the evidence base for a warranty conversation with any supplier.
For commercial and delivery configurations where these duty cycles bite hardest, see our delivery scooter wholesale page; for the wider supply framework — documentation, batch consistency, shipping modes — the moped scooter sourcing guide covers the sequence.
BENLG Technician Support
BENLG (Dongguan Benlg) has manufactured electric two- and three-wheelers since 2003, exporting to more than 65 countries. Our fleet-spec vehicles use brushless hub drives built for sustained commercial duty — the BENLG-MINI delivery platform, for example, runs a 3000W brushless hub motor with dual swappable battery packs, a 200 kg rated load and front and rear disc brakes.
What we provide for dealer and fleet partners is the layer this guide is really about: spare parts at scale so first-year failures are fixed without grounding vehicles, technician training on diagnosis and service procedures, wiring documentation and error-code references for the models you operate, and remote diagnostic support after launch.
If you are building a service operation around an electric two-wheeler business, tell us the models, the fleet size and how far your workshops are from your riders, and we will come back with a parts and training proposal rather than a catalogue. For the choice between drive layouts in the first place, see mid-drive vs hub motor; for vehicles specified around delivery duty, what makes a good delivery motorcycle goes through the requirements in order.
📩 Contact the BENLG export team with your models, fleet size and service setup | 💬 WhatsApp answered during China business hours.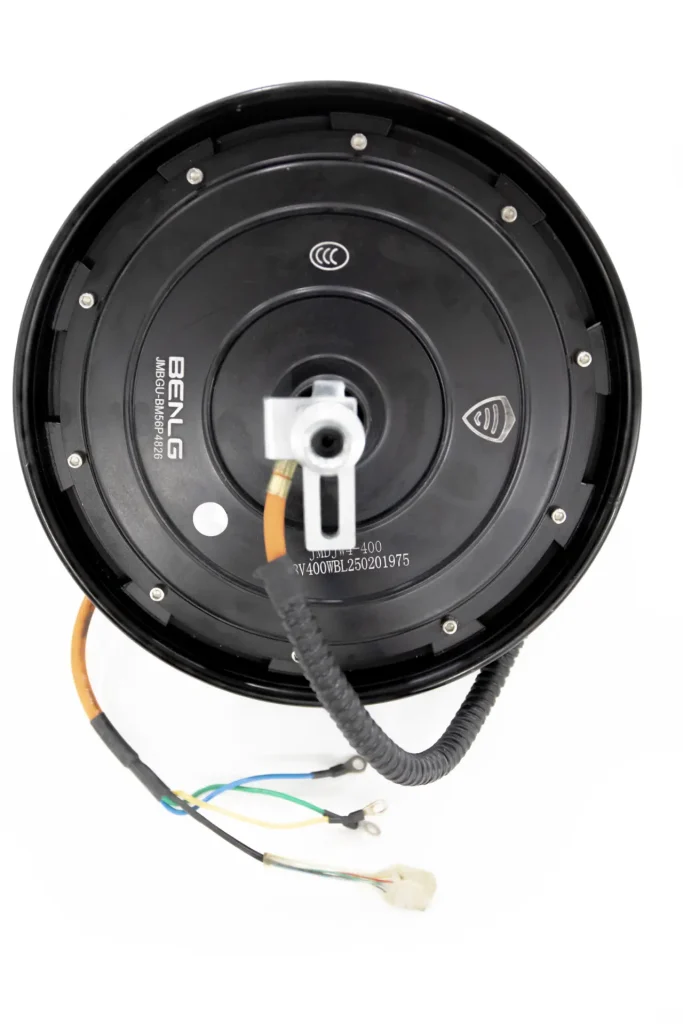
FAQ
How do I know if a motorcycle hub motor is bad or the controller?
Work the power path first: brake switches, fuse, connectors, then phase wires. A motor that hums but will not spin points to a phase or Hall-sensor fault; complete silence points to the power path or the controller. Two quick tests separate them: disconnect the three phase wires — if a previously stiff wheel turns freely, the controller is shorting the phases; and check for the magnetic drag when two phase terminals are touched together, which confirms the windings are intact.
What does a grinding noise from the hub motor mean?
Usually worn bearings — grinding that increases smoothly with wheel speed is the signature. Before condemning the motor, rule out brake drag (a rubbing caliper) and tyre or rim damage, both of which mimic motor noise. Check free-spin noise and lateral play with the wheel off the ground.
Can a hub motor be repaired, or should it be replaced?
Bearings, Hall sensors and connectors are repairable by a qualified technician; for fleet economics, the faster route is usually swapping the complete unit and repairing the old one at the depot. One caution: reassembly has to restore the sealing properly — if the workshop cannot do that to specification, a rebuilt unit is better kept as a spare in wet markets than returned to frontline service.
Can I fit a sensorless controller to a motor with failed Hall sensors?
It will move the vehicle, but the risk lies in the matching rather than in sensorless control as such. A third-party controller selected on voltage and wattage alone may not be calibrated to this motor’s phase current limits or start-up behaviour, which shows up as weaker low-speed torque, a less smooth launch and — depending on the unit — higher consumption. It is a reasonable temporary arrangement for a private owner; it is not appropriate as a commercial fix, where “the wheel turns” is not an acceptance criterion.
What causes a hub motor to cut out under load?
Four usual suspects: connector resistance heating up under current, battery voltage sag (with BMS or controller limiting to protect the pack), controller thermal protection, and — if power has degraded permanently — magnet demagnetisation from past overheating. Check connectors and battery first; the motor is the last suspect, not the first.
What should a dealer check before ordering a replacement hub motor?
Wheel size, axle diameter and dropout width, mounting and anti-rotation arrangement, phase wire gauge and connector pin assignment, sensor type and connector, controller compatibility, brake interface and the rating plate. Voltage and wattage alone are not enough to identify a compatible unit.